This spring I knew I needed another coop. I was on a budget, and since I didn’t want the project to take all year, I needed it to be something I could build completely on my own–I had a deadline and intended to stick to it. I also knew it needed to be tall enough I could walk into it. My shelter in the goose/duck run is built similarly but it’s only one sheet of plywood on it’s side on each wall and I have to get down on my hands and knees to collect eggs or do other chores.
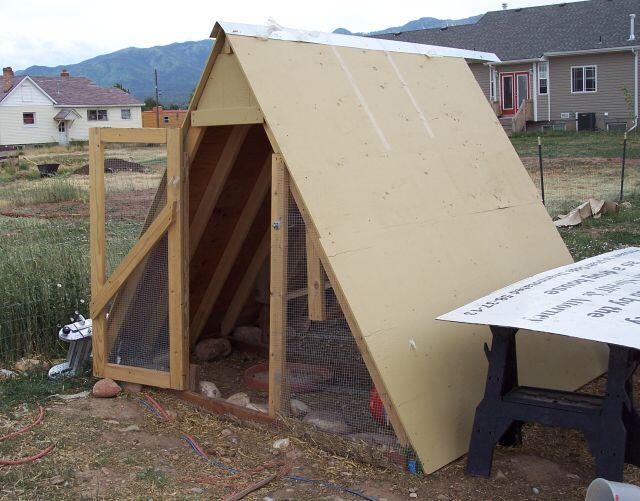
After much mulling over, this A-frame is what I finally came up with. The foot print is 8×8 and I built it entirely by myself in one (1) day (plus half an hour of preparation the night before). To do this I had to have a nail gun–it’s the only way to go because drilling screws and hand-pounding nails would have taken way too long–luckily for me, my ad loaned me his. I decided I wanted a coop with LOTS of ventilation, especially for the summer since there is almost no shade in my yard and it gets really hot in summer. I wanted to make sure the birds had plenty of shade to settle into during the hotter seasons. Since this coop was intended only for roosters I didn’t work in a place for nest boxes, but you should be able to adjust the plans slightly for a regular flock.
The night before I started work in earnest I trimmed my uprights at a 60 degree angle. I had to feed my lengths into the miter saw to at a 90 degree angle instead of running it along the guides. It was the only way I could turn the saw enough to get the cuts right. This probably ended up in my having imperfect cuts and lengths, but perfection was really not my goal.

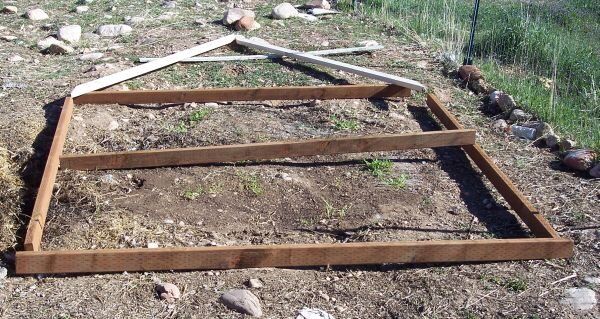
The next day, bright and early, I laid out my base boards so I could make sure the location I had cleared was my best bet. I used 2x4x8 pressure-treated lumber for the foundation so it will last longer. My ground is extremely rocky and uneven–there are more large rocks then there is dirt, so I had to do the best I could. This was a pretty even area to work on. 
Next I nailed the uprights to the top board. I tried to do the uprights on one corner and then the other, but it ended up being too hard to get the pieces to fit together without it falling apart. Instead I stuck the middle and edges along one side onto the ridgeline, then lifted the side to add the middle and edge pieces on the other side. I also nailed the bottom boards together at this point and attached the ‘roof’ boards to them. I only used part of the wall supports at first because I knew I would need to lift the edges to wrap the hardware cloth for the next step and I wanted it to be light enough for me to handle on my own. 
In this step I cut the hardware cloth to size and slid it under the base far enough to roll rocks on the bottom, and still have enough to wrap up the sides. I used 2-foot-wide pieces of 1/2″x1/2″ for this part. 
Next I nailed the rest of the uprights into place. Even though the ‘roof’ has a pretty good slope, I still placed the boards at the standard 16″ widths. Actually, since I was working alone I didn’t measure this part, I just eyeballed it. If I lived in a really rainy area I would have added more cross-pieces on the ground and put a real floor on. Since saving time and money was important to me, and I live in a desert, I didn’t. My other two coops both have real floors, but with lots of straw bedding this will work great, especially since my birds like to scratch away the bedding and put their bellies on the cool ground when it’s hot. 
Next I put large rocks in the coop to keep anything from coming under the wire once I had it finished. All of these rocks came from no more than twenty feet away from where the coop stands. In a lot of areas they suggest burying the wire outward or down to prevent digging, but I seriously have so many rocks that no dog or coyote would get that far without giving up.

Next I wrapped more hardware cloth around the end of the coop. I wanted to put this on next so when I nailed on the sides the nails would hold the wire in place and I wouldn’t have to deal with trimming it back too much. At this point it’s just wrapped and formed to the boards a bit. I had to pull and twist it slightly when I put up the walls. It would have been better if I had pulled it tighter, but that was a two-person job, and it’s secure this way. 
You can’t tell in thsi picture, but since I used 2-foot wide hardware cloth as my wire I ‘sewed’ the pieces together where they met with bits of wire that surrounded the roll to keep ferrets and raccons out. I used 4×8 plywood in 1/2 inch thicknesses for the slanted roof, and I lifted the corners with my toes or a rock to keep them off the ground so if we get a little snow they won’t rot so easily. It also allows a little extra ventilation around the bottom of the coop. I folded the hardware cloth up around the walls before I added the plywood so it would be nailed firmly in place, preventing critters from getting in. 
Next I added my roosts. I hung them from the roof with some supports where necessary because I wanted plenty of floor room in the middle for feed and water bowls. I also only ran one roost half the length of the wall to ensure I could get the feed out of the weather so the occasional rain wouldn’t make it moldy. If I were going to put in nest boxes, I probably would have done it here on the left, then placed the feeder on a shelf above it to take advantage of the space. 
Again, I haven’t been especially precise about my measurements or where I nailed things. I played around on this side for a minute to make sure the gate would be big enough to get me through with any feed bags or whatnot that I needed to carry, then nailed the boards in place. When I built the door I actually measured top and bottom and each side to make sure the door would fit the hole, since I didn’t force the doorway to be totally square. It swings really well and is plenty sturdy, though.
Here’s the door hanging tight. I also added a bit of leftover OSB paneling from building our other coop the previous year to the top of the sides.  Next I painted and added the metal flashing to the ridgeline to keep water out and finish it off. I still need to locate my nippers and cut off the extra bit of flashing that hangs over the back. This winter I’ll have to board or cover the sides mostly with plastic to keep out the worst of the weather, but between now and November my birds will be most comfortable with the extra air flow. When I planned this I put one of the roof walls toward the west so it would block the majority of the rain and wind, which it has done well in the past month or so. I haven’t had any wet feed and it creates a nice wind break for them if a storm gets too fierce. I don’t have a fence up around this coop yet as the roosters free-range all day most days, but I do intend to do something about it soon so my hens can take turns free-ranging while the extra boys stay shut in a smaller run for the day.
And here you see my food and water setup.


I am so impressed! I feel like I've accomplished something special if I can change the vacuum bag by myself!
You mean I can't just keep them in the bathtub?
Thank you for the helpful photos, which helped me to visualize the similar coop I'm about to build. My chickens are verboten where I live but the garage coop has been too dusty and it's time to move them outdoors. My version will be covered on the outside with lattice and flowering vines atop the hardware cloth. Thank you too for reminding about the importance of keeping the food dry. I had overlooked that.
it really very good.
I love it !
I like it !
thanks :)- .
Bathmate
thanks
I can't wait to build something like this for myself. My chicks are getting bigger and feathered so it's time! Thanks for the pictures and ideas.
You live somewhere cold? Idaho winters are pretty cold. I'd like to hear more about your winterizing.
Thanks a ton it is a wonderful help, now to make an a-frame chicken coop is without a doubt very easy by using your tips. Thanks
Excellent design! How's cleaning of this coop?
not sure if you still check this but how many chickens do you think are max for a coop this size?
If they stayed in the coop full time, I'd say 4 standard sized or 6 bantams. If they had a run, you could easily expand the space depending on run size. The general rule of thumb is minimum 10 square feet per bird if you have standard sized birds. Bantams need a little less. If my birds are stuck in the coop and run full time, I push for more like 15-20 feet of space per bird. The bigger the running room, the less likely you'll have trouble with picking or cannibalism. If you only lock them up at night and let them free range all day, you could easily fit 15 in there if you put in enough roost space–but only if they free range pretty much every day or have a really big run.
I ended up using this coop mostly for growing out chicks until they were big enough my dog wouldn't eat them, or for separating extra roosters or pairs of birds I was trying to breed.